
Job hunting creates enough stress without the added pressure of complex design software. Many candidates believe they need expensive tools or graphic design skills to look professional. This is a common misconception. You can create a sleek, effective, and readable curriculum vitae using free tools you already know.
Google Docs has evolved into a powerful resource for job seekers. It offers accessibility, cloud storage, and simple formatting options that rival paid software. It is also generally friendly toward Applicant Tracking Systems (ATS). These are the software programs recruiters use to filter applications.
This guide explains exactly how to make a resume in Google Docs. The process covers everything from using built-in templates to designing a custom layout from scratch. You will learn how to format your work history, structure your skills, and export the final file.
Also read:
- How to Create a Resume in Word (Step-by-Step Guide)
- How to Create a Resume in Apple Pages (Step-by-Step Guide)
Preparation: what to gather before you start typing
Writing and formatting at the same time slows you down. A more efficient approach involves gathering your data first. Open a separate blank document or use a notebook. This acts as your “master resume” file.
Collect the following information before you open a template:
- Contact Information: Your full name, phone number, professional email address, and LinkedIn profile URL.
- Work History: Exact start and end dates for your previous roles. Include month and year.
- Job Descriptions: Bullet points describing your achievements for each role. Focus on results and numbers.
- Education: University names, degrees, and graduation years.
- Skills List: Technical and soft skills relevant to the jobs you want.
Having this data ready allows you to copy and paste text later. This lets you focus entirely on the design and layout steps described below.
Try The Free AI Resume Builder
Try our free AI resume builder, and create an optimized resume in no time. Creating a resume has never been this easy!
Option 1: How to use a Google Docs built in resume template (the fast method)
The quickest way to start is the built-in template gallery. Google provides several pre-designed layouts. These are basic but professional. They work well for conservative industries like finance, law, or administration.
Step 1: Access the gallery
Open Google Docs in your browser. Look at the top right of the screen for the “Template gallery” button. If you do not see it, click File, then select New, and finally click From template gallery.

Step 2: Choose a style
Scroll down to the section labeled “Resumes.” You will see five unique options.
- Swiss: A clean, modern look with sans-serif fonts. It uses lines to separate sections.
- Serif: A traditional layout. It uses Times New Roman or similar fonts. This is good for academic or corporate roles.
- Coral: A more creative option with color accents.
- Spearmint: A simple design with a green graphical element.
- Modern: A compact layout that fits a lot of text.
Step 3: Customize the content
Click on your chosen design to open it. The document will contain Latin placeholder text. Highlight the text and type over it with your own information. Be careful not to delete the hidden tables that hold the layout together. If you delete a section by accident, press Control + Z (Windows) or Command + Z (Mac) immediately to undo the mistake.
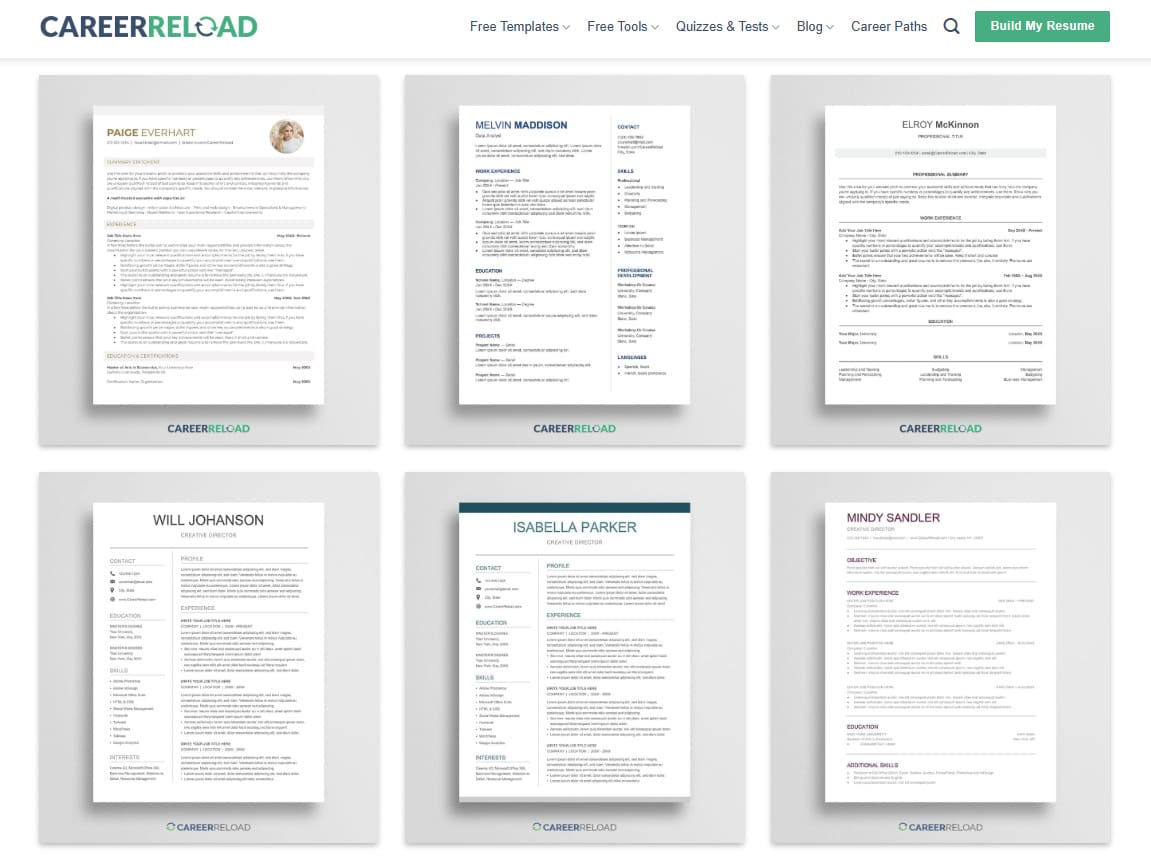
Option 2: Using third-party templates for a unique look
The standard Google templates are used by millions of people. Your application might look identical to another candidate’s. You can solve this by using third-party resources.
Many designers create specialized templates that are compatible with Google Docs. These often feature better use of white space and typography.
You can find a variety of distinct Google Docs resume layouts at Career Reload. They offer specifically designed for Google Docs and are free to download. This is often better than downloading a .docx file because you do not risk formatting errors during conversion.
How to use a third-party template:
- Visit a resource site like Career Reload to browse their gallery.
- Select a design that fits your industry.
- Look for the access link or button provided for Google Docs.
- The document will open in “View Only” mode.
- Go to “File” in the top menu and select “Make a copy.”
- Rename the file to your own name and save it to your Drive.
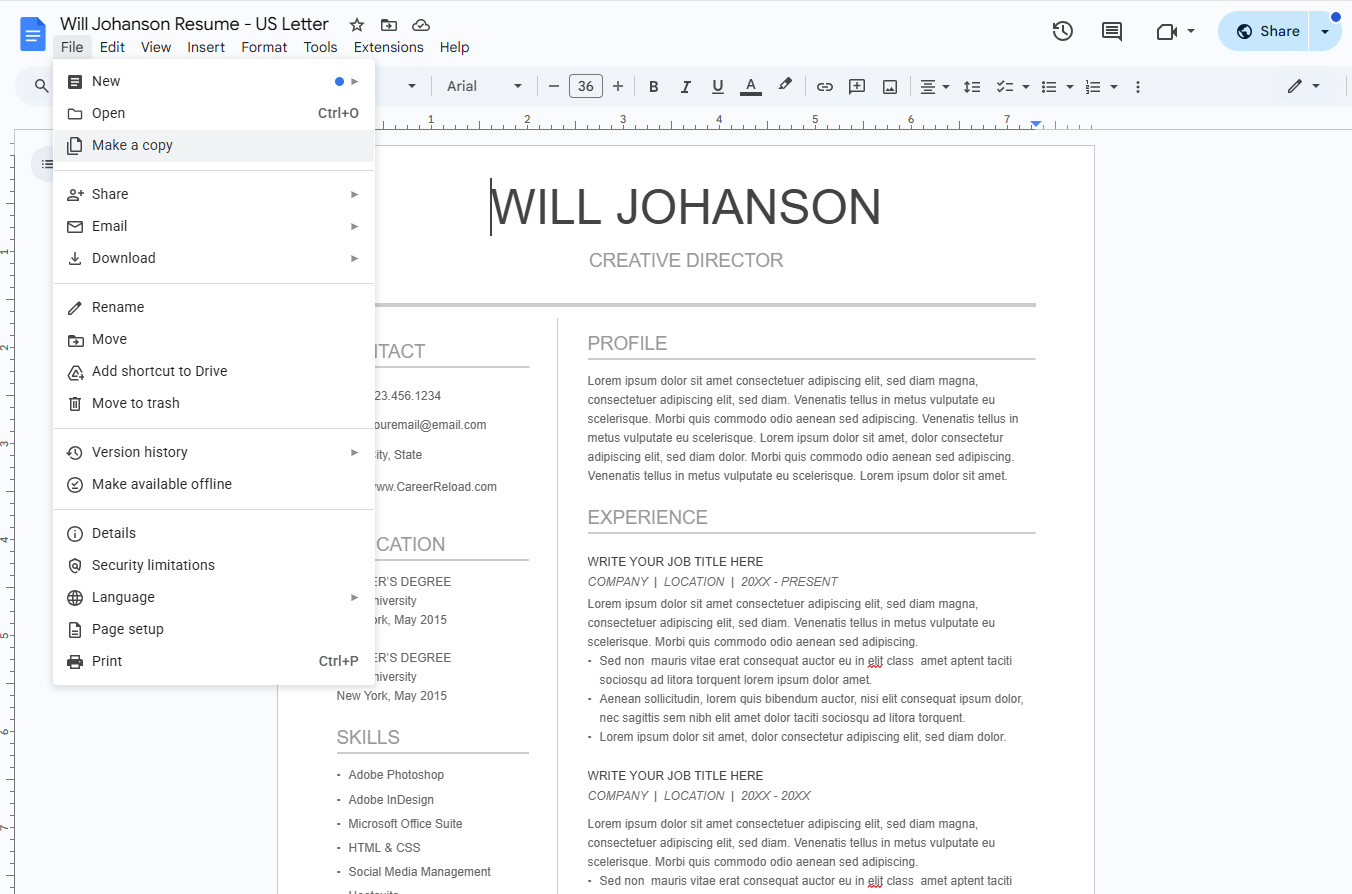
Download the “Will” resume template
You now have a fully editable version of a professional design. You can edit the text, change the colors, and move sections around just like you would in a blank document. This method gives you a high-end look with minimal technical effort.
If you are unsure how to phrase your experience, you might also find a resume builder helpful to draft the content before placing it into your template. Alternatively, you can also create your resume in the builder, export it as .doc and drop it in Google Drive and open in Google Docs. Now you have a strong draft to continue from and a basic layout structure. You might also find the resume examples by industry helpful.
Option 3: How to make a resume in Google Docs from scratch (the custom method)
Built-in templates are convenient. However, they can be rigid. Creating a document from scratch gives you total control over margins, fonts, and spacing. This method allows you to fit more content on a single page.
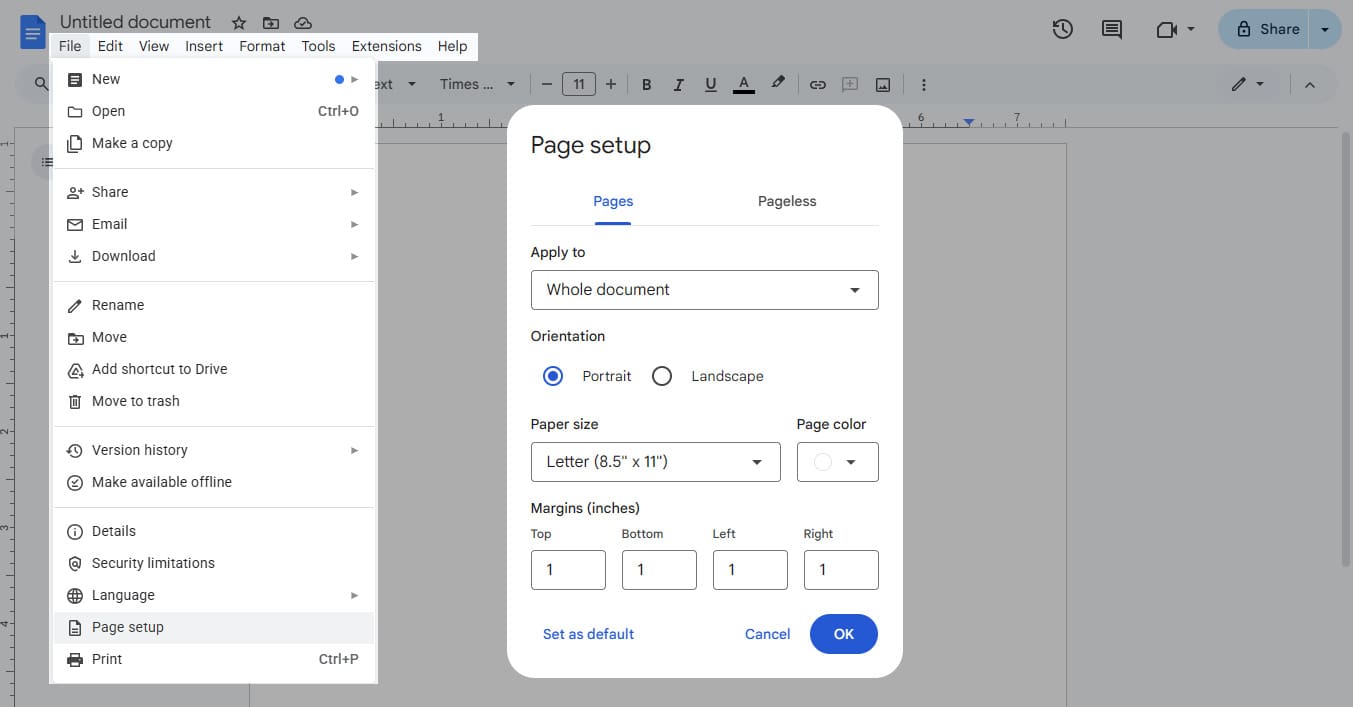
Step 1: Set up the page
Go to File and select Page setup. Set your margins to 0.5 inches or 1 inch on all sides. Smaller margins give you more writing space. Standard 1-inch margins look cleaner. Choose the setting that fits your amount of content.
Step 2: Choose your font
Select a professional font that is easy to read. Good choices include Arial, Roboto, Calibri, or Georgia. set your body text size between 10 and 12 points. Set your headers between 14 and 16 points.
Step 3: The invisible table trick
This is the most valuable technique for alignment. Most people try to use the space bar or tab key to move dates to the right side of the page. This often results in messy, uneven lines. Use invisible tables instead.
- Click Insert, then Table.
- Select a 2×1 table (two columns, one row).
- Type your job title in the left column.
- Type your employment dates in the right column.
- Align the right column text to the right side using the alignment toolbar.
- Right-click anywhere inside the table and select Table properties.
- Change the “Table border” width to 0pt.
The lines will disappear. Your dates will remain perfectly aligned with your job titles. You can copy and paste this invisible table for every job entry.
Step 4: Use headings
Use the built-in heading styles for your section titles. Highlight “Experience” or “Education.” Click the “Normal text” dropdown menu in the toolbar and select Heading 1. This helps screen readers understand the document structure. It also makes it easy for you to change the font of all headers at once later.
Advanced formatting tips to make your resume stand out
Once you have the content in place, you need to polish the visual presentation. Small details make a document look finished and authoritative.
Font pairing
Using one font for the whole document is safe. Using two can be stylish. Pick one font for your headings (like Montserrat) and a different one for your body text (like Roboto). Ensure both are easy to read. Avoid cursive or script fonts entirely.
Using color wisely
Black and white is standard. However, a subtle use of color can guide the recruiter’s eye. You might use dark blue or slate grey for your section headers. Avoid bright colors like yellow or neon green. They are hard to read on white paper. To change text color, highlight the word, click the “A” icon in the toolbar, and select a custom color.
Hyperlinks
Your email address and LinkedIn URL should be clickable links.
- Highlight your LinkedIn URL.
- Click the “Link” icon (it looks like a chain link) or press Control + K.
- Paste the full web address.
You can also shorten the text. Instead of displaying a long URL, you can edit the link text to say “LinkedIn Profile” or “Portfolio.” This looks cleaner.
Handling page breaks
A common formatting error occurs when a job entry splits across two pages. You might have the job title on page 1 and the bullet points on page 2. This confuses the reader.
To fix this, place your cursor before the job title. Click Insert, then Break, and select Page break. This forces the whole section to start fresh on the next page.
Critical: ensuring your Google Doc is ATS-friendly
Most large companies use Applicant Tracking Systems. These robots scan your text before a human sees it. If the software cannot read your file, your application may be rejected.
Avoid the header and footer sections
Google Docs has a specific “Header” area that repeats on every page. Do not put your vital contact information here. Some older ATS parsers ignore the header and footer completely. Place your name, phone number, and email at the top of the main body of the document.
Keep icons minimal
Graphics, logos, and complex icons can confuse scanning software. It is safer to use text. Instead of a phone icon, type “Phone:”. Instead of an envelope icon, type “Email:”.
Stick to standard section titles
Be creative with your summary, but be boring with your titles. Use standard headings like “Experience,” “Education,” and “Skills.” Do not use vague terms like “My Journey” or “What I Know.” The software looks for specific keywords to categorize your data.
For more help with structuring your content for these systems, you might consider using a dedicated resume builder. These tools guide you through the process field by field.
How to save and export your resume correctly
You have finished writing your resume. The layout looks sharp. Now you need to send it. The file format you choose matters.
PDF is the gold standard
Always send your resume as a PDF unless the job description specifically asks for a Word document. A PDF “freezes” your formatting. It ensures the recruiter sees exactly what you see. If you send a native Google Doc or a Word file, the fonts might change if the recruiter does not have them installed.
To do this, go to File, select Download, and click PDF Document (.pdf).
Naming your file
Do not save your file as “Resume.pdf” or “Copy of Resume 1.” Recruiters receive hundreds of files. If yours has a generic name, it might get lost.
Use a professional naming convention:
- FirstName_LastName_Resume.pdf
- FirstName_LastName_JobTitle.pdf
Keeping a backup
Download a .docx version as well. Keep this for your records. Some recruitment agencies require an editable version to add their own logo before sending it to clients. It is useful to have both formats ready.
Frequently asked questions about Google Docs resumes
Is Google Docs better than Word for resumes?
Google Docs is free and allows for easy cloud access. Microsoft Word has more advanced formatting features but costs money. For a standard resume, Google Docs is sufficient and easier to share. Word is better for complex layouts with heavy graphics.
Where can I find free resume templates for Google Docs?
You can find built-in templates inside the application. For more distinct designs, websites like Career Reload offer free downloads that you can upload to your Drive.
What are the best resume fonts available in Google Docs?
The best fonts are clean and legible. Roboto and Montserrat are excellent modern choices available directly in the font menu. Times New Roman and Georgia are great if you prefer a more traditional serif look.
How do I share my resume via a cloud document service link?
Click the “Share” button. Change the access settings to “Anyone with the link.” Select “Viewer” permissions so they cannot change your text. Copy the link and paste it into an email or application form.
Can I use built-in spelling and grammar checkers for resumes in Google Docs?
Yes. Google Docs automatically checks spelling. You can also run a manual check by clicking Tools and selecting Spelling and grammar.
Can I add a photo to my resume in Google Docs?
You can add a photo by clicking Insert > Image. However, you should only do this if it is standard in your country. In the US and UK, photos are generally discouraged to avoid bias. In parts of Europe and Asia, they are expected.
Conclusion: hit send with confidence
You do not need to be a graphic designer to look professional on paper. Learning how to make a resume in Google Docs puts the power in your hands. The platform is free, intuitive, and accessible from anywhere.
Whether you choose a quick built-in template or build a custom layout with invisible tables, the result is the same: a clean document that tells your career story.

We’re a team of writers and career experts who share practical insights to help you navigate the professional world. Our members include Certified Professional Résumé Writers (CPRW) and Certified Digital Career Strategists (CDCS), and we bring experience from many industries to help you build your career with confidence. Download free Word resume templates and resume templates for Google Docs.
Others also read
How to Write an ATS Resume to Impress Bots and Hiring Managers
How to Ask for a Letter of Recommendation (with Template)
Administrative Assistant Resume Example and Template
Optimizing Your Resume with a Resume Builder
Nurse Resume Example and Writing Guide
Why January is One of the Best Months for Job Hunting
Top Trends Influencing Job Interviews
Effective Project Manager Resume Examples & Template
You Might Also Like These Free Templates
Google Docs Resume Format – Debbie
Free Resume Form Template
Free Resume Design – Megan
2 Column ATS Resume Template
ATS Friendly Resume Format for Word – Lindsay
Goal Planner Template
Cover Letter Template with Monogram
Professional Cover Letter Template
Free Modern Resume Template for Word
Free Job Application Tracker for Excel
Free Resume Template Download for Word – Farrah
Free ATS-Friendly Resume Template – Emily